Interface overview
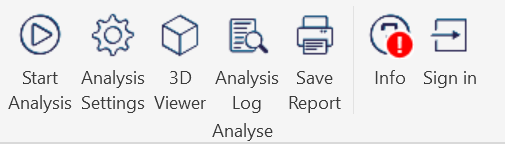
The LUX ribbon menu contains the buttons that control the analysis workflow, plus account and version info.
Start Analysis
Click Start Analysis to begin the simulation. If rooms are already selected, the analysis starts immediately for those rooms. Otherwise, the tool enters selection mode where you can select rooms in the active plan view, then click Finish on the options bar to proceed.
The command automatically collects geometry and clears previous heatmap results to ensure a clean state.
Assign a keyboard shortcut to Start Analysis in Revit's keyboard shortcuts settings. Select a room, press the key, get the result — without reaching for the ribbon each time.
Analysis Settings
The Analysis Settings window is the central configuration hub for the simulation, grouped into Daylight Configuration, Revit Integration, and Analysis Geometry.
3D Viewer
The 3D Viewer opens a dedicated window showing the analyzed geometry with the daylight heatmap, so you can inspect compliance room by room. It also lets you verify geometric interpretations, glass detection, and sky visibility angles.
Analysis Log
The Analysis Log displays the status record of the most recent analysis. Consult this log to investigate specific errors or warnings flagged during the simulation.
Save Report
Click Save Report to export a PDF of the most recent analysis run. The report opens with an overview of every room analyzed in that run, followed by detail pages per room, notes on the shading geometry used, and the key entries from the Analysis Log.
Info
Info shows the installed LUX version. A red icon appears when a newer version is available.
Sign In
Click Sign In to authenticate with your LUX account.